Wednesday, November 13, 2013

Everything I've learned about health & fitness, I learned in the last 6 months

I have to say, I've learned a lot about health and fitness in the last 6 months and its not what you think....


Well, let's start from the beginning, I've learned a lot about myself in the last year but mostly in the last 6 months. In the last 6 months, what I've learned the most has to do with how I feel about fitness and exercising and diet. I've pretty much been eating whatever I want over the last 6 months, and I must say, it's been quite marvelous, indeed. And let me just clarify what "whatever I want" means...yes I have been eating pizza, chicken wings, burgers and fries, but I've also been eating pasta free zucchini lasagna (recipe coming soon!), chicken with roasted broccoli, and smoothies. The reality of it is, I love eating healthy, but I also love eating shit food sometimes and I've learned to not feel bad about it. Let me repeat, I like eating shit food and I DON'T FEEL BAD ABOUT IT! The second I realized that, it's like a little light bulb went off in my head. I mean, who am I really feeling bad for? Not me!


I feel like everyone is so consumed with trying to keep up with this "image" of being thin and fit. Who said you have to maintain a certain image? That's crazy! We have vision boards in our home and the main image on mine was a picture of a bikini fitness model. I took that down a couple months ago. I've finally realized exactly what I want to look like. Are you ready? ME! I just want to look like me. So I'm owning that shit, dammit! I also realized that previously, all the killing myself in the gym and doing my best to eat as clean as possible wasn't for me. It was because I felt like I had. Don't get me wrong, I love exercising. But I don't like feeling obligated to do it and feeling bad when I just didn't feel like it. So I stopped feeling obligated and I stopped feeling bad. Now, have I put on weight? Yup. But it's all good. I'll just buy bigger jeans ;)


Now, I haven't stopped exercising though. But I have stopped going to the gym and feeling obligated to be in the gym 4-5 days a week, which, by the way, is really hard to feel motivated to do when you're a nurse. It's an exhausting career, to say the least. But I am totally ok with doing yoga in my living room via Netflix and going for a run. Besides, yoga pants are really comfy. Also, I love me some wine. So I've stopped feeling like I need to limit the amount of alcohol I drink because of the calories. 


The other major, and I mean MAJOR, thing I've come to accept is my body type. Your DNA dictates how your body looks and the results you will get from exercising. That was definitely a tough pill to swallow because you can't change your DNA. I mean I love all the junk in the trunk I've got but getting really muscular, ripped legs just isn't happening. And I've been woking out for years, some years more so than others. I've done pretty much everything I could do to get those results, with no avail, shy of living on a competition diet (which is definitely not realistic or healthy for your body for an extended period of time). And I'm a realist. So I live realistically now-a-days and I'm totally fine with it. I have cellulite. It is what it is. Nobody's perfect. Don't get me wrong, I haven't become a lazy bum that lives on the couch eating day old cold pizza and drinking wine all day, every day. Just some days :)


In the end, do whatever works for you. If you love being a gym rat and eating as clean as possible, do it and own it. If you're overweight and happy with it, own it. But whatever you choose to do, healthy or not, do it for yourself and screw societies image of what you should or shouldn't look like. Ok, that was pretty cheesy, but it's true nonetheless. 


Wednesday, August 7, 2013

Pat's (Vegan) Black & Raspy Muffins

This new recipe comes from one of my big brothers, Patrick. In addition to these muffins being vegan, they're lactose and dairy free! This is because my SIL is lactose intolerant and, well, it's just not fair making muffins your wife can't eat. Needless to say, cooking is a huge thing in our family and one of our favorite past times. The second is eating said food. Pat also has an AMAZING Raspberry Cheesecake with an Oreo crust recipe that I may be able to pry from his hands. We'll see. Anyways, prior to me posting the recipe to these I have to mention that I have not made these muffins yet, so I have no idea how they taste. But I have a lot of Pat's other baked goods and....they're delicious! So I think it's safe to assume, these will be too. But you guys be the judge and let me know what you think! I'll pass it on...

Pat's (Vegan) Black & Raspy Muffins


1⁄2 cup of vegan margarine 

1 cup raw sugar

1-1 1⁄4 pureed banana


8 oz. pureed blackberries 


1 tsp. vanilla

3⁄4 tsp. baking soda

1⁄4 tsp. salt


2 cups whole wheat flour 


1⁄2 cup almond milk

8 oz. raspberries (halved) 


Raw sugar for topping

Preheat oven to 375°. Grease or line 18 standard muffin cups (or 12 large muffin cups). In a large bowl, mix butter on high until creamy. Mix in sugar. Reduce mixer speed to medium, and add pureed banana. Reduce mixer speed again to low-medium, and mix in pureed blackberries and vanilla. Mix in baking soda and salt. Fold in half of the whole wheat flour and then half of the almond milk, then repeat with the other halves. Last, fold in the raspberries. Spoon into muffin cups and sprinkle with raw sugar immediately. Bake for 15- 20 minutes (closer to 15 for standard muffins and closer to 20 for large muffins), or until they start to turn golden brown and spring back when touched. 

There you go folks! This recipe is straight from my email. I did not alter it in any way. Except fix typos...Enjoy!

Photo by: Patrick Ryan


Thursday, July 18, 2013

Paleo Banana Bread

Before I start I have to say that the base of this recipe is coconut flour and if you're not use to eating it, well....it takes some getting use to. Needless to say, it doesn't always go over well. BUT, it's really good for you and loaded with fiber. The problem with coconut flour is it's very dry...and a little pricey. So the way to get around that in this recipe is to use VERY ripe bananas. I'm talking about the pretty much black ones that are on the verge of being spoiled. The more ripe they are, the more moist they are and it compensates for the dryness of the coconut flour. With that said, the taste is the same as a typical banana bread, which means it's just as yummy! 


Another recipe I jacked off Pinterest and did it my own way.


Paleo Banana Bread


⅔ c Coconut Flour


1 tsp salt


1 tsp baking soda


2 tsp cinnamon


3 ripe bananas, mashed


6 eggs


2 tsp vanilla extract


Preheat oven to 350. Mix all the dry ingredients together in a small bowl, set aside. Mash bananas in a large bowl (I used a potato masher), and add remaining wet ingredients. Mix well. Add dry ingredients to wet ingredients and mix until well blended. Pour mix into a greased bread pan and place in the oven for 45-50 mins. 


Dry ingredients
Mashed bananas
Wet ingredients with bananas

Now a yummy way to jazz this recipe up is to add a teaspoon of pumpkin spice seasoning or put a mix of turbinado and cinnamon on top of the mix prior to placing it in the oven for a really sweet crunch! This recipe wasn't a big hit in my house but only because of the coconut flour and, the other downside to it, it's grittiness. Obviously, you could sub out coconut flour for almond flour, since I really have done a good job of making coconut flour sound that appetizing. BUT then it wouldn't be Paleo! Hope you guys enjoy this one!


Wednesday, July 17, 2013

Cabbage and Chicken Soup

I know it's been forever since I've posted on here but I'M BACK! And I've changed the name of the blog too because this name is more fun and more cooler! One of my coworkers made a delicious cabbage and chicken soup (that I sampled) that is the inspiration for this recipe. What's cool about this recipe is, you can add whatever veggies you'd like. She added okra to her's, which I really liked, but totally forgot to buy. Anyways, this recipe make a lot of soup and it's really good.

Cabbage and Chicken Soup

1 package of organic chicken breast cutlets (about 3-4 cutlets)

1/2 of a small head of green cabbage

1/2 of a small vidalia onion

1 small bag of frozen corn

4 carrots peeled and cut into 1 inch pieces

1 28oz can of crushed tomatoes (I used Muir Glen Fire Roasted Tomatoes)

1 vegan bouillon cube (I used Rapunzel vegan vegetable bouillon)

Salt, black pepper and garlic powder to taste

A dash of cayenne powder


Preheat oven on broil. Season chicken to your liking and place chicken in oven to cook. This shouldn't take more than about 10 minutes MAX as these are cutlets and they aren't very thick. I seasoned my chicken with Borsari seasoned salt that I get from Whole Foods.

Cut up veggies and place in a big ass pot. Empty can of tomatoes into said big ass pot. Then fill can up with water and empty water into big ass pot as well. Throw in your bouillon cube and seasonings and put stove on medium heat. While this chicken is cooking, place lid on the pot and let it simmer.

Cut cooked chicken breasts into cubes and throw in big ass pot with everything else, when finished cooking. Leave stove on medium heat for approximately 20 minutes and then reduce to low and let simmer an additional 25 minutes or until veggies are to your desired tenderness. I like my veggies with a little crunch, so 45 minutes was exactly right for me. Longer, obviously, will yield softer veggies. 


The great thing about this soup is...you can do whatever you want with it! Thank you Terry for inspiring me and I hope you guys enjoy this one!


Monday, November 12, 2012

Vegan Chocolate Chip Cookies

So I'm just gonna get straight to the point here: THESE ARE AMAZING!!!! Ok, now that I got that out, we can get started. Another recipe I found on Pinterest, but jazzed up! This is also a simple recipe and is gluten free as well. Let's get to it:

Vegan Chocolate Chip Cookies

2 1/2 cups of almond flour

1/2 tsp of baking soda

1/4 tsp sea salt

1/2 tbsp cinnamon

1/2 cup chocolate chips (or raw cacao nibs, if you can get them)

1/2 cup grape seed oil

1/2 cup agave

1 tbsp vanilla extract

Preheat the oven to 350 degrees. First, mix all the dry ingredients. I used Ghiradelli 60% Cacao chips because they actually didn't have any raw cacao nips at Fresh Market. Still just as good though. Second, mix all the wet ingredients. Then pour the wet ingredients in with the dry ingredients and mix everything together. I don't have a mixer so I just did this by hand, it's really not that difficult anyways and it all mixes together pretty quick.


Spoon dough onto a greased or lined cookie sheet. I used a teaspoon, and I'm glad I did as they expanded, tremendously, during baking.


Bake at 350 degrees for 8-10 mins. Let cool first, then remove from the sheet, it'll be easier.

Again, these are so freaking DELICIOUS!! Try these yourself and let me know what you think. I understand that if you do not have a gmail account you cannot reply or comment on my blog, but since I post these on Facebook and Pinterest, feel free to comment there and let me know. Enjoy and thanks for being healthy!!

Balsamic Parsnips

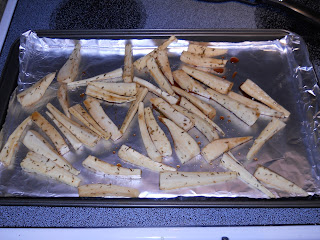
So these are a great side to, well...ANYTHING. They're easy to make and they just so happen to be yummy, as well! So if you don't know what a parsnip looks like, it looks like this...


So basically, they look like white carrots. They're softer than carrots and have a totally different flavor, they're kinda sweet. But they're great! This recipe is simple, so let's get to it:

Balsamic Parsnips

4 parsnips, peeled

1/2 tbsp agave

1 tbsp balsamic vinegar

1 tsp thyme


Preheat the oven to 425. Mix all the ingredients except the parsnips in a bowl. Then cut the parsnips in half then in quarters. The thicker the pieces, the longer they take to cook. Toss the cut parsnips in the balsamic mixture and coat well.


Lay the parsnips on a lined or greased cookie sheet, in a single layer. Place in the oven for 20 mins. Turning about halfway through, 10 mins into it. Remove from the oven when the time is up and enjoy!


Thanks for being healthy!

Tuesday, October 23, 2012

Smashed Partatoes

Soooo what we initially paired this with last night for dinner, honestly, wasn't really a good combo. And it's not because anything I made didn't taste good. I just think that the flavors involved in this and the flavors of the crab cakes and shrimp we made last night were clashing. But I paired this recipe with today with my Sweet Baby Ray's Burgers (see previous post), and what a combo!

I know you're probably like,"This dumbass misspelled potatoes, what an idiot!" Yeah, I totally didn't. I mean, potatoes obviously isn't spelled like that but for what's in this recipe, the spelling is fitting and correct. Parsnips + Potatoes= Partatoes. The combo of the two is actually really good and love the aroma of parsnips as they're cooking. And even if you've never had parsnips before, the flavors of EVERYTHING else that's involved in the recipe, including the potatoes, covers up the taste of them. Just in case you were worried about not liking the way they taste.

I used Yukon Gold potatoes for this because they're softer, so they cook faster, and I like the darker yellow color they have. Parsnips are softer too so they cook in the same amount of time as the potatoes. Ready Freddy?

Smashed Partatoes

3 medium Yukon Gold Potatoes, unpeeled

4 large organic parsnips, peeled

1 tbsp butter

1 tbsp finely chopped fresh rosemary

1 tbsp garlic powder

1 tbsp onion powder

Sea salt and pepper to taste

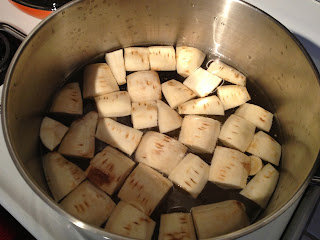
After peeling the parsnips and NOT peeling the potatoes, chop them up into large chunks. Takes less time to cook. Boil the partato combo on high for approximately 30-40 mins or until soft and easy to split with a fork. Drain partatoes and throw them back in the empty pot. Smash them up a little with a potato masher, then add the remaining ingredients. Depending on how smooth you like your partatoes. I like mine lumpy. After you've reached the desired lumpiness, mix with a spoon to ensure all the seasonings and butter spread evenly throughout.


Notice I didn't use any milk? That's ANOTHER great reason to use the Yukon Gold. Since they're softer, they're more moist as well. So no need for the milk, and the extra calories.

If you wanted to use fresh garlic, that would be a great idea. Hope you enjoy this as much as I did. Thanks for being healthy!